Tagging re-invented and fully integrated
into the Windows File Explorer

Tagging for Windows Help
Tagging for Windows allows you to tag your
files and folders within the Windows File Explorer. More general information or a free download is available at the website. Please contact us for anything: questions, bugs, request, comments, etc.
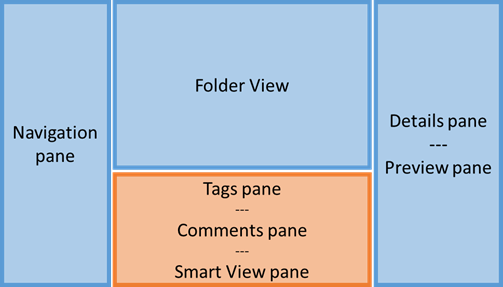
The standard Windows Explorer is extended
with a Tagging node  in the tree (Navigation pane). When a tag is selected
in the tree, the tagged files and folders are shown in the Folder View. Below the Folder View,
another pane is presented. This can be either the Tags pane, Comments pane or
the Smart View pane.
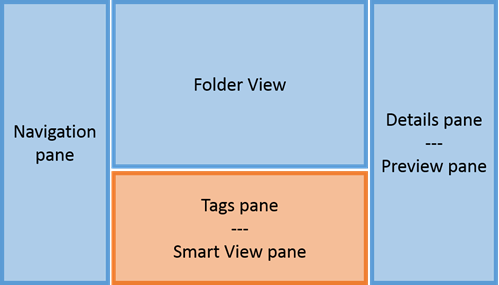
in the tree (Navigation pane). When a tag is selected
in the tree, the tagged files and folders are shown in the Folder View. Below the Folder View,
another pane is presented. This can be either the Tags pane, Comments pane or
the Smart View pane.
Next to the directly visible parts, the
context menu’s are extended as well. Dependently of the context, the context
menu for files and folders have Tag with, Add to ‘Tag With’,
Show in folder, Untag or Search and Tag files.
Tags and Comments pane
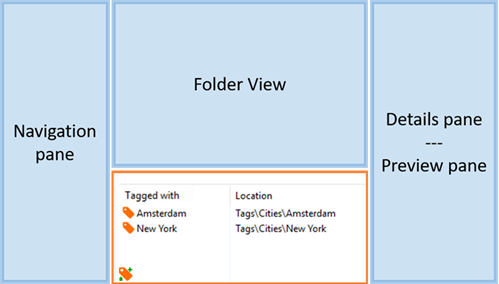
The Tags pane can be found below the Folder
View in the explorer. It shows the Tags of the selected file or folder (or
another Tag).
The Name, Location and ‘Add or select Tag’
button are shown. When multiple files and/or folders are selected, only the in
common are shown.
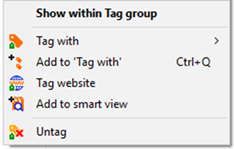
The Tags pane allows you to use the context
menu to:
-
Show within Tag group: see Navigate to a Tag .
-
Tag with: see Tag a Tag .
-
Add to ‘Tag with’: see Add
Tag to ‘Tag with’.
-
Tag website: see Tag a Website.
-
Add to smart view: see Use
in Smart View.
-
Untag: see Untag an a File or Untag a Folder.
-
Add or select Tag  : see Add or select Tag.
The Comments pane can be found below the
Folder View in the explorer. It shows the list of comments of a selected file, folder,
or tag. A comment can be added, deleted and changed.
For every comment it is shown when (date
and time) and by who (user name) it’s created and last changed. A comment can
be added, deleted or changed.
A new comment can be added to a file, folder, or tag. The comment can be saved or canceled.
In
general a tag is a keyword or term linked to a piece of
information. In particular, this kind of metadata helps to describe a File,
Folder or other Tag and allows it to be found by browsing or searching with
help of the Tags. . A tag can be linked to one or more Files, Folders or
other Tags. Files, Folders or other Tags can have one or more Tags.
Create a New Tag
─
Select the Tag Group or Tag where you want to
create a new tag.
○
In the context menu select New Tag.
A Tag with the default name, New Tag,
is created. The name of the Tag can be changed now.
Note: Some characters cannot be used in the
name. See restrictions.
─
Select the Tag Group or Tag where you want to
create a new tag.
○
Press Ctrl+Shift+A to create a new tag as child.
─
Select the Tag where you want to create a new tag.
○
Press Ctrl+Shift+S to create a new tag as
sibling.
Copy a Tag
─
Select the Tag you want to copy.
○
In the context menu select Copy.
○
On the keyboard, press Ctrl+C.
○
Use the mouse to Drag and Drop the Tag while
pressing the Ctrl key.
The selected Tag is now on the clipboard. A
paste action is needed to complete the copy.
─
Select the Tag you want to rename.
○
In the context menu select Rename.
○
On the keyboard, press F2.
Note: Some characters cannot be used in the
name. See restrictions.
Delete a
Tag
When a Tag is deleted, the Tag will be
deleted permanently. All tagged files, folders and other Tags will be untagged from
this Tag.
─
Select the Tag you want to delete.
○
In the context menu, choose Delete.
○
On the keyboard, press Delete.
Cut a Tag
─
Select the Tag you want to cut.
○
In the context menu, choose Cut.
○
On the keyboard, press Ctrl+X.
○
Use the mouse to Drag and Drop the Tag.
The selected Tag is now on the clipboard. A
paste action is needed to complete the move.
Paste a Tag
The Paste is used to complete a combination
of actions. The combination can be:
. Cut/Paste:
The Tag will be moved.
. Copy/Paste: The Tag will be copied.
- Select the location you want to
complete the operation.
○
In the context menu, choose Paste.
○
On the keyboard, press Ctrl+V.
Tag destination
restriction
─
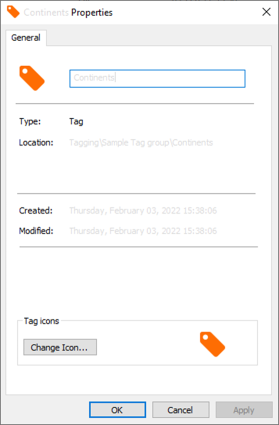
Select the Tag whose properties you want to
view.
○
In the context menu, choose Properties.
The following dialog will be shown in which
the properties can be viewed.
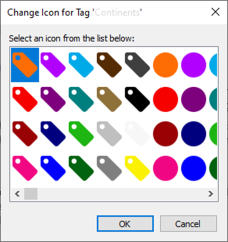
Press Change Icon to change the icon
of the selected tag. When pressed the following dialog is shown.
─
Scroll through the list to find an icon to use.
Choose OK on the selection. OK also closes the
dialog.
─
Select OK or Apply on
the Properties window to save the changes. OK also closes the
dialog.
Use in Search and Tag
─
Select the Tag you want to use in the ‘Search
and Tag’ application.
○
In the context menu, choose Search and Tag
files. 1
The application Search and Tag is started
with the selected Tag used as a Path.
This path is the location from which the
application starts searching for files.
Copying
a Tag
Copying a tag can be done by using copy followed
by a paste. Tags can be copied to other tag groups as well. All child tags are
copied also. The tagged files, folders and other tags of the original Tag will
also be tagged with the copied Tag.
Moving a Tag
Moving a tag can be done by using cut followed
by paste. Tags can be moved to another tag groups as well. All child tags
are moved also. All tagged files, folders and other tags are preserved.
Add to
‘Tag with’
─
Select the Tag you want to add to the list of
last used Tags. The Tag is placed on top of the list. When the option Allow multiselect entries
in ‘Tag With’ list is selected it is also possible
to add multiple Tags to the list of last used Tags.
○
In the context menu, choose Add to ‘Tag
with’. 1
○
On the keyboard, press Ctrl+Shift+Q.
Select the tag you want to merge with
another tag. The selected Tag will remain in the system. The child Tags and
links of the other Tag will be merged into the selected.
─
In the context menu, choose Merge Tag with
…. A window with the Tag groups is opened to select the other Tag. Select
a Tag as you would do in Windows File Explorer.
○
Press Merge to perform the merge, the
window is closed afterwards.
○
Cancel closes the
window. A merge is not performed.
Select the Tag you want to export. The Tag,
all child Tags and all linked Files and Folders are exported.
○
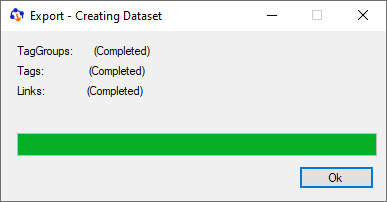
Open the context menu and choose Export
and in the sub-menu select Export. A File Save
dialog is shown to specify the location of the export file. When the Export is
finished the following dialog is shown indicating how many Tag Groups, Tags and
Links are exported.

Select the Tag you want to export. The Tag,
all child Tags and all linked Files and Folders are exported.
○
Open the context menu and choose Export
and in the sub-menu select Export to CSV. A File
Save dialog is shown to specify the location of the CSV file. When the Export
is finished the following dialog is shown indicating how many Tag Groups, Tags
and Links are exported.
The word ‘Tagging’ is short for linking a
Tag to a File, a Folder or even another Tag.
Tag a File, Folder or Tag
A File, Folder or Tag can be tagged using two
methods as described below.
Add or select Tag
─
Select the File, Folder or Tag you want to tag.
○
Press the Add or select Tag button in the Tags pane or on the keyboard press Ctrl+Shift+’+’.
▪
In the Tags pane an editable combo box with list
autocomplete will appear.
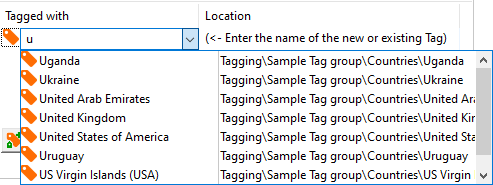
▪
By typing text in the combo box, matching tags
are shown in the list.

▪
When a Tag is selected from the list, this Tag
will be used to tag the File, Folder and/or Tag. If the typed text does not
match any of the existing tags, a new Tag will be created and will be used to
tag the File, Folder and/or Tag. Applied new tags will be created automatically
in a new special Tag group named ‘Base Tag group’.
Tag
with
─
Select the File, Folder or Tag you want to tag.
When the option Allow
multiselect entries in ‘Tag With’ list is selected
it is also possible to tag a File/folder with multiple Tags and a Tag with
multiple Files/Folder and/or Tags.
○
In the context menu select Tag with.
▪
Select an entry from the list of the last (max
9) used Tags, or select More
Tags …
○
On the keyboard press Ctrl+Shift+T
to select the last used entry of the ‘Tag With’ list.
More Tags
More Tags opens a new window containing all
Tag Groups. It is now possible to link multiple Tags to the selection. All Tag
and Tag Group functions are available in this window.

─
Select a Tag as you would do in Windows File
Explorer.
○
Press Apply or Select to link the
Tag to the selection. The selected Tag is also placed on top of the list last
used Tags. Select also closes the window.
○
Cancel closes the
window.
Select a file or folder in the Folder View
and drag it to the Navigation Pane. The ‘Link’ action indicator will be shown
(see picture below). Drop the file or folder on a Tag in the Navigation Pane.
The file or folder is now linked with the Tag.

Select a Tag in the Folder View and drag it
to the Navigation Pane. Press the Alt key for the ‘Link’ action (the
indicator in the picture is shown). Drop the Tag on another Tag in the
Navigation Pane. The tags are now linked.
Tag a Website
Websites can be ‘tagged’ as well. However,
because the function Tagging is only integrated in the Windows File Explorer
and not in every possible Internet Browser, this works as follows:
─
First select the address of the website in the
Internet Browser.
○
In the context menu select Copy.
○
On the keyboard, press Ctrl+C.
─
Now select a Tag in the Windows File Explorer.
○
In the context menu select Tag website.
Tagging for Windows links a Tag to a File,
Folder or other Tag. A link always has two sides, one always being a Tag, the
other being a File, a Folded or a Tag.
Because the link has two sides (is
bi-directional), two ways are possible to see the extra information you can add
within the Windows File Explorer:
1.
Viewed from a Tag, the Files and Folders linked
to this Tag are shown in the Folder View
2.
Viewed from a File or Folder, the Tags linked to
this File or Folder are shown in the Tags pane.
When a link exists, navigation is possible
to both sides of it.
Navigation to a Tag using ‘Show in Tag
group’ will select the Tag in the Navigation pane of the Windows File Explorer.
Navigation to a Folder using ‘Show in
Folder’ will select the Folder in the Navigation pane of the Windows File
Explorer.
Navigation to a File using ‘Show in Folder’
will select the File in the Folder View of the Windows File Explorer.
When a Tag is untagged the link between
the Tag and the File, Folder or another Tag is removed.
─
In the Folder View select the File you what to
navigate.
○
In the context menu select Show in Folder.
─
In the Folder View select the Folder you what to
navigate.
○
In the context menu select Show in Folder.
Navigate to a Tag
─ In the Tags pane select the Tag you want to navigate.
○
In the context menu select Show within Tag group.
Untag a File
─ In the Folder View of the Windows File Explorer, select the linked
File(s) you want to untag
○
In the context menu select Untag.
─
In the Tags pane select the Tag(s) you want to untag.
○
In the context menu select Untag.
Untag a Folder
─
In the Folder View of the Windows File Explorer,
select the linked Folder(s) you want to untag
○
In the context menu select Untag.
─
In the Tags pane select the Tag(s) you want to untag.
○
In the context menu select Untag.
Use in Smart View
─
In the Tags pane select the Tag(s) you
want to use in Smart View.
○
In the context menu select Use in Smart
View. 1
Tag a Tag
─
In the Folder View of the Windows File Explorer or
in the Tags pane select the Tag(s) you want to tag.
○
In the context menu select Tag with.
1
Add Tag to ‘Tag with’
─
In the Tags pane select the Tag you want
to add to the list of last used Tags. The Tag is placed on top of the list.
When the option Allow multiselect entries in ‘Tag With’ list is selected it is also possible to add multiple Tags to the list of
last used Tags.
○
In the context menu select Add to ‘Tag
with’. 1
○
On the keyboard, press Ctrl+Shift+Q.
Add
or select Tag
See Add or select Tag.
Tagging
node
The Tagging node contains the collection of
Tag Groups and the Smart Views.
In the navigation pane of the Windows File
Explorer select the Tagging node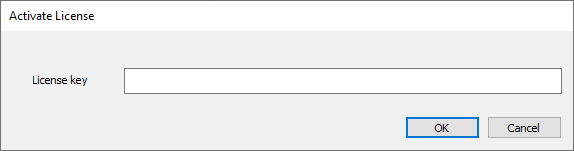 . Open the context menu and choose Join Shared Tag group.
The Join Shared Tag group is opened, and an
already shared Tag group can be selected.
In the navigation pane of the Windows File
Explorer select the Tagging node. Open the context menu and choose License and in the
sub-menu select License activation.
The Activate License dialog is
opened and the activation key can be entered here.
In the navigation pane of the Windows File
Explorer select the Tagging node. Open the context menu and choose License and in the
sub-menu select License deactivation. The current activated license will
be deactivated.
In the navigation pane of the Windows File
Explorer select the Tagging node. Open the context menu and choose License and in the
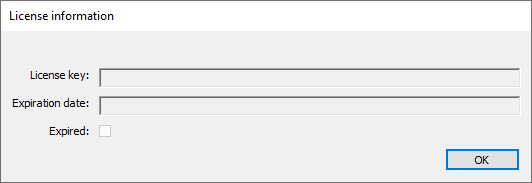
sub-menu select License information. The License information
dialog is opened and shows the License key, Expiration date and whether
the license is Expired.

In the navigation pane of the Windows File
Explorer select the Tagging node. Open the context menu and choose License and in the
sub-menu select Additional license(s). The Tagging for Windows website
is opened where additional licenses can be obtained.
Check for Updates
─
Select the Tagging node in the tree.
○
In the context menu, choose Check for
updates. The Tagging for Windows website is queried for the availability
of a new version.
─
Select the Tagging node in the tree.
○
In the context menu, choose Download new
version of 'Tagging for Windows'. When a new version is available is
enabled and the Tagging for Windows download page is opened in de default
Internet Browser.
In the navigation pane of the Windows File
Explorer select the Tagging node. Open the context menu and choose Shared Tagging. The Shared
Tagging application is opened.

In the navigation pane of the Windows File
Explorer select the Tagging node. Open the context menu and choose Auto Tagging. The Auto
Tagging application is opened.

In the navigation pane of the Windows File
Explorer select the Tagging node. Open the context menu and choose Restore. The Restore
Removed dialog is opened. In this dialog it is possible to restore deleted tags.

A historical overview shows all removed
Tags. Each entry shows how many Tags, File/Folder/Tag links and File/Folder/Tag
comments were deleted. The deleted Tags can be grouped by Months, Days, Hours
and Minutes. History entries can also be deleted. Restored history entries can
be kept on disk, in the export file format, for future use.
─
Select the Tagging node in the tree.
○
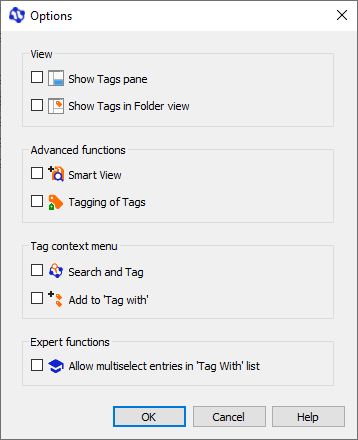
In the context menu, choose Options.
The following options dialog is shown.

When this option is selected the Tags pane is shown. Default this option is selected.
 Show Tags in Folder view
When this option is selected the child Tags
of the current selected tag are shown in the Windows Explorer Folder View.
Default this option is selected.
 Smart
view
Smart
view
When this option is selected the Smart View node is shown in under the Tagging node in the navigation pane and
the context menu of a Tag will contain ‘Add to Smart View’. Default this option is selected.
 Tagging
of Tags
Tagging
of Tags
When this option is selected it is possible
to tag Tags and the context menu of a Tag will contain ‘Tag with’. Default this option is selected.
 Search
and Tag
Search
and Tag
When this option is selected it is possible
to use a Tag or Folder in the ‘Search and Tag’ application and the context menu
of a Tag or Folder will contain ‘Search and tag files’. Default
this option is selected.
 Add to ‘Tag with’
When this option is selected it is possible
to add a Tag to the list of last used Tags and the
context menu of a Tag will contain ‘Add to ‘Tag with’’. Default this
option is selected.
 Allow
multiselect entries in ‘Tag With’ list
Allow
multiselect entries in ‘Tag With’ list
When this option is selected it is possible
to add multiselect File/Folder and/or Tag combinations to the ‘Tag With’ list.
When selected, the options Tagging of Tags and Add to ‘Tag With’ are automatically selected and disabled. Default this option is selected.
Select the default location for tags
created with ‘Add or select Tag’. This can be
any tag group or tag.
Select the Tagging node in the tree. All opened Tag Groups are exported.
○
Open the context menu and choose Export
and in the sub-menu select Export. A File Save dialog is shown to
specify the location of the export file. When the Export is finished the
following dialog is shown indicating how many Tag Groups, Tags and Links are
export.
Select the Tagging node in the tree. All opened Tag Groups are exported.
○
Open the context menu and choose Export
and in the sub-menu select Export to CSV. A File Save dialog is
shown to specify the location of the CSV file. When the Export is finished
the following dialog is shown indicating how many Tag Groups, Tags and Links
are exported.
─
Select the Tagging node in the tree.
○
In the context menu, choose Help.
The Tagging for Windows help website is opened in de default Internet Browser.
─
Select the Tagging node in the tree.
○
In the context menu, choose Refresh.
All opened Tag Groups are refreshed.
In the navigation pane of the Windows File
Explorer select the Tagging node. Open the context menu and choose Database and in the
sub-menu select Update database. The Tagging for Windows database will
be updated to the newest structure and version.
In the navigation pane of the Windows File
Explorer select the Tagging node. Open the context menu and choose Database and in the
sub-menu select Correct database permissions. The permissions needed for the
correct functioning of Tagging for Windows are restored.
In the navigation pane of the Windows File
Explorer select the Tagging node. Open the context menu and choose Tools and in the sub-menu
select Manage locations. The separate wizard allows to manage the
different ways the same location is found. See the separate help for more
information.
In the navigation pane of the Windows File
Explorer select the Tagging node. Open the context menu and choose Tools and in the sub-menu
select Collect diagnostic info. Information about the database, permissions, installed files and
versions, locations like drives and shares, configuration, events are collected
and written in a compressed file. This file can be send to support if needed.
─
Select the Tagging node in the tree.
○
In the context menu, choose About Tagging
for Windows. The following dialog is shown containing the version
number of Tagging for Windows, copyright information and a link to the Tagging
for Windows website.

A Tag Group is a hierarchical ordered
collection of tags.
When a Tag Group is closed it will be
removed from the Windows File Explorer tree. All containing Tags and their
links to Files, Folder and other Tags will be preserved. A closed Tag Group can
be reopened.
When a Tag Group is deleted all
containing Tags and their links to Files, Folder and other Tags will
permanently be destroyed. It will be removed from the Windows File Explorer
tree.
Note: A Shared Tag Group cannot be
deleted. The shared and synchronization needs to be stopped first.
Opening a Tag Group
A Tag Group that was previously closed
can reopened.
─ Select the Tag Group you want to delete.
○
In the context menu select Delete.
○
On the keyboard, press Delete.
─ Select the Tag Group you want to close.
─
The Tag Group remains available and can be opened
again.
○
In the context menu select Close.
─
Select the Tagging node in the tree.
○
In the context menu, choose New Tag group.
A new Tag Group
with the default name New Tag group is created.
─
Select the Tag Group you want to rename.
○
In the context menu, choose Rename.
○
On the keyboard, press F2.
Note: Some characters cannot be used in the
name. See restrictions.
─
Select the Tag Group whose properties you want
to view.
○
In the context menu, choose Properties.
A dialog will be shown in which the
properties can be viewed.
─
Select the Tagging node in the tree.
○
In the context menu, go to Open Tag group.
A submenu is shown with the previously closed Tag groups.
Export a Tag Group
Select the Tag Group you want to export.
All the Tags and all linked Files and Folders are exported.
○
Open the context menu and choose Export
and in the sub-menu select Export. A File Save dialog is shown to
specify the location of the export file. When the Export is finished the
following dialog is shown indicating how many Tag Groups, Tags and Links are
exported.
Select the Tag Group you want to export.
All the Tags and all linked Files and Folders are exported.
○
Open the context menu and choose Export
and in the sub-menu select Export to CSV. A File Save dialog is
shown to specify the location of the export file. When the Export is finished
the following dialog is shown indicating how many Tag Groups, Tags and Links
are exported.
Select the Tag group you want to share and
sync.
○
Open the context menu and choose Share
& Sync. The Share & Sync dialog is shown where you can specify
the location to share and sync the Tag group.

Smart
View 
With a Smart View a selection of files
and folder can be created based on a combination of Tag(s). Every time a new Tag is used in the Smart View, the possible
combinations are updated.
The possible combinations are shown in
the list that of the Smart View Pane.
Every item in the list represents a
collection of Tags.
If the collection is included  , the Result will
contain all files and folder having all the Tags of the collection.
, the Result will
contain all files and folder having all the Tags of the collection.
If the collection is excluded  , the Result will not
contain any file or folder having all the Tags of the collection.
, the Result will not
contain any file or folder having all the Tags of the collection.
Example:
The Tags “Amsterdam”, “New York” and
“London” are used in the Smart View.
The Tag(s) collection “Amsterdam + New
York” is included.
The Tag(s) collection “London” is
excluded.
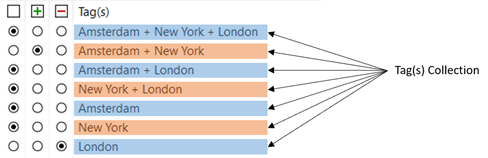
The result of the
Smart View will be:
“files/folders
connected with Tag Amsterdam as well as Tag New York
minus
files/folders connected with Tag London“
A Smart View can be saved for later use.
A collection of one of more Tags that
can be combined in a Smart View. Every collection of Tag(s) can be Ignored,
Included or Excluded. The result of the combination of Tag(s) collections and
their individual settings is a list of files and/or folders.
Smart View pane
The Smart View pane can be found below
the Folder View in the explorer. It shows the combinations that can be made.

The Smart View pane allows you to use the
context menu to modify the combinations.
Add a Tag to a Smart View
─
Select a Tag.
○
In the context menu select Use in smart
view. 1
○
Use the mouse to Drag and Drop the Tag. Drop the
Tag on the Smart View node.
─
Select the Smart View node.
○
In the context menu select Show results.
○
In the pane below the Folder View press the show
results button  .
.
─
Select the saved Smart View  you want to edit
○
In the context menu select Edit.
○
In the pane below the Folder View press the show
results button  .
.
Smart
View result name restrictions
─ Select the saved Smart View you
want to rename.
○
In the context menu select Rename.
○
On the keyboard, press F2.
─
In the pane below the Folder View select the Tag or Tag combination you want to include.
○
In the context menu select Plus.
○
On the keyboard, press +.
─
In the pane below the Folder View select the Tag
or Tag combination you want to remove.
○ In the context menu select Remove Tag(s).
○
On the keyboard, press Delete.
─
Click in the pane below the Folder View.
○
In the context menu select Remove all Tag(s).
─
In the pane below the Folder View select the Tag or Tag combination you want to ignore.
○
In the context menu select Ignore.
○
On the keyboard, press Spacebar.
─
Select the Smart View node or the Results node in the tree.
○
In the context menu, choose Save.
○
In the Smart View Pane, choose the button .
A new Smart View with the default name New
Smart View is created.
─
Select the Smart View you want to delete.
○
In the context menu, choose Delete.
○
On the keyboard, press Delete.
─ Select a Tag(s) Collection in the Smart View Pane.
○
In the context menu, choose Remove tag(s).
○
On the keyboard, press Delete.
All Tag(s) collections containing the Tags
of the selected Tag(s) Collection will be removed.
─
Select a Tag(s) Collection in the Smart View Pane.
○
In the context menu, choose Minus.
○
On the keyboard, press ▬.
The result of the Smart View will not
contain any files or folders having the Tags of the selected Tag(s) Collection.
─
Select the Smart View node in the tree.
○
In the context menu, choose Clear.
○
In the Smart View Pane, choose the button  .
.
○
In the context menu of the Smart View Pane, choose Remove all Tags
All Tag(s) Collections will be removed.
Item name
The
name may contain up to 255 characters, including spaces. The following
characters may not be used for the name: \ (back-slash), / (forward
slash), : (colon), * (asterisk), ? (question mark), "(double
quotes), < (less
than symbol), > (greater
than symbol), and | (pipe
or vertical bar.
Copy- and Move Tag destination
The destination tag cannot be a sub tag
of the source tag.
Ctrl+Shift+A : Create a new Tag as child of
the selected Tag or Tag group.
Ctrl+Shift+G: Go to the Tagging node in the
Navigation Pane(tree).
Ctrl+Shift+S: Create a new Tag as sibling
of the selected Tag.
Ctrl+Shift+M: Show the ‘More Tags dialog’
for create a link.
Ctrl+Shift+Q: Add the selected item to the
‘Tag with’ list.
Ctrl+Shift+T: ‘Tag’ (create a link) with
the first entry on the ‘Tag with’ list.
Ctrl+Shift+V: Go to the Smart View node in
the Navigation Pane(tree).
Ctrl+Shift+’+’: Add or select a Tag in the
Tagpane.
Ctrl+Shift+Tab: Navigate to the location of
a linked file or folder shown in the Folder View.